By default Site Directory template is not available in SharePoint 2010. Actually this template is in hidden state. In order to make it visible, we need to follow the below steps -
1> Open "C:\Program Files\Common Files\Microsoft Shared\Web Server Extensions\14\TEMPLATE\1033\XML\webtempsps.xml" XML file in the mentioned path.
2> Search for Site Directory in the XML.
3> Change the Hidden parameter from TRUE to FALSE.
4> To create it as a sub-site, there is a need to run the following command: stsadm.exe -o activatefeature -id 5F3B0127-2F1D-4cfd-8DD2-85AD1FB00BFC –url http://oursite
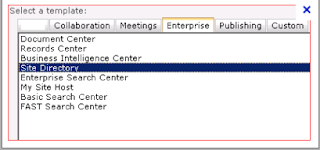
5> Once that is done we can see the option of Site Directory template under the Enterprise tab while creating a new Site Collection as shown in the screenshot below
 6> Now we can go ahead and create a new site directory using the above template. Once the Site Directory is created, Microsoft provides an option of linking older site collections to the Site Directory. To manually add sites,we need navigate to the Sites list present in the newly created Site Directory i.e. http://sitedirectoryURL
/SitesList
7> For the new sites that would be created, we need to do the below configurations as shown in the screenshot below
In the Central Administration -> General Application Settings -> Configure Site Directory
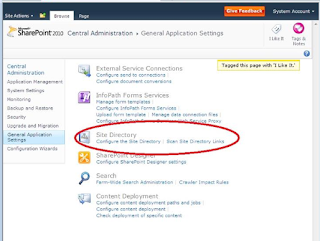
Once the link is opened, we need to provide the Site Directory URL and enable the Site Creation Metadata. This is enabled inorder to provide data wrt the site collections either to be mandatory or not. This will be visible when we create new site collections as shown in the screenshot below.

 When the Site Directory is not implemented, the Site Categories option is not available.
For adding or deleting Site Categories in Site Directory of Sharepoint 2010, steps can be followed as mentioned in the below link, which applies to MOSS 2007, but the same steps can be followed for SP 2010 as well with some self understanding.
http://office.microsoft.com/en-in/sharepoint-server-help/add-or-change-categories-in-the-site-directory-HA010106564.aspx
Now coming to the second link on the Site Directory in General Application Settings in CA i.e. Scan Site Directory Links we can provide links for the lists and libraries looking for any broken or updated link. There is a timer job "Site Directory Broken Links Scan" that runs daily to do a validation and update the Title and Description of any updated link on to the Site Directory.
1> Open "C:\Program Files\Common Files\Microsoft Shared\Web Server Extensions\14\TEMPLATE\1033\XML\webtempsps.xml" XML file in the mentioned path.
2> Search for Site Directory in the XML.
3> Change the Hidden parameter from TRUE to FALSE.
4> To create it as a sub-site, there is a need to run the following command: stsadm.exe -o activatefeature -id 5F3B0127-2F1D-4cfd-8DD2-85AD1FB00BFC –url http://oursite
5> Once that is done we can see the option of Site Directory template under the Enterprise tab while creating a new Site Collection as shown in the screenshot below

7> For the new sites that would be created, we need to do the below configurations as shown in the screenshot below
In the Central Administration -> General Application Settings -> Configure Site Directory

Once the link is opened, we need to provide the Site Directory URL and enable the Site Creation Metadata. This is enabled inorder to provide data wrt the site collections either to be mandatory or not. This will be visible when we create new site collections as shown in the screenshot below.
In the above screenshot we have selected only one site category to be mandatory. We get to see the below screenshot when we create the new site collection.

For adding or deleting Site Categories in Site Directory of Sharepoint 2010, steps can be followed as mentioned in the below link, which applies to MOSS 2007, but the same steps can be followed for SP 2010 as well with some self understanding.
http://office.microsoft.com/en-in/sharepoint-server-help/add-or-change-categories-in-the-site-directory-HA010106564.aspx
Now coming to the second link on the Site Directory in General Application Settings in CA i.e. Scan Site Directory Links we can provide links for the lists and libraries looking for any broken or updated link. There is a timer job "Site Directory Broken Links Scan" that runs daily to do a validation and update the Title and Description of any updated link on to the Site Directory.
