Friday, March 24, 2017

cachehostinfo is null when starting distributed cache

An error comes up when we try to start the Distributed Cache Service on the Services on the Server page in the Central Administration. The error that comes up is "CacheHostInfo is null". This happens for particular server where we want to start the service. To troubleshoot the issue follow the below steps -


1> Login to the server for which this error had come up while starting the distributed cache.
2> Open the PowerShell ISE and run the below command
 
                 Get-SPServiceInstance -Server 
 
 3> Once we see the output, search for the Distributed Cache Service Instance. Get the ID associated to the Distributed Cache instance. once done, run the below command


          $s = get-spserviceinstance
          $s.Delete()


4> This will cleanup the distributed cache on that particular server.
5> For adding the server for the Distributed Cache, run the below powershell command

                  add-SPDistributedCacheServiceInstance -Verbose


6> For validation, one can check in the CA in Services on the Server page or run the below commands to check is distributed cache is running on the required servers
 Get-SPServiceInstance | ? {($_.service.tostring()) -eq “SPDistributedCacheService Name=AppFabricCachingService”} | select Server, Status

Friday, December 30, 2016

Setting up Synchronization of On-Premises Active Directory with Office 365

In office 365, there is a service called as the Azure Active Directory or better know as Azure AD. It is an integral part of Office 365. It is a free service available on each and every tenant. Azure AD is the identity store of the MS cloud. It is the Active Directory that these servers are hooked into for the identity needs. Azure AD is very different from the on-premises AD. Both of these manage the users, groups and contacts, but there is no concept of OU (Organizational Units) in Azure AD. It is a flat hierarchy. But with the concept of Azure Active Directory Domain Services (Azure AD DS), machine objects came into picture, where the Azure machines can be attached to the domain. Here the Azure level Domains become the container to hold resources related to Azure. But these Azure VMs cannot be connected to the Domains present or created on on-premises AD.

Now coming to the identities, that are being taken care in Office 365, are as follows -
a> Cloud-Only Identities - they are the simplest identity scenario, where all the user identities are stored on Office 365. Once can go to the Office 365 Admin Center, select Active Users and then add them manually one by one or import multiple users using CSV files as shown in the screenshot below.


b> Synchronized Identities - Here, the on-premises AD is the master of the identities. There is a service that would run regularly which would push the on-premises user data to Azure AD. All changes that are made in on-premises are synchronized properly on the Azure AD using Azure AD connect. This synchronization can include passwords. Technically, password hashes are synchronized and not the passwords stored in on-premises AD. If password hashes are chosen to for synchronization, then the end users can log into the office 365 using the same password as they log into on-premises. This is also called as SAME-SIGN-ON.

c> Federated Identities - We will talk about this bit later in the next post.

As we are aware and confident on the 1st option, we can skip this. Now, coming to synchronized identities, I share the high level steps which I performed to implement the same. Here in the below mentioned steps, I am not implementing the password synchronization part. here we will be synchronizing the users from on-premises AD to Azure AD.

The pre-requisites for this implementation is, one should have an O365 subscription. The account used to log in is the global administrator. I have utilized Amazon AWS Windows VM for the same. I have my Server Admin user name and password ready.


so, let's start from scratch -

1> Create a VM and enable the AD related roles and features as shown in the screenshot below as we will be creating an Active Directory/Domain Controller out of it. 
2>Once the roles and features are installed, went ahead and created a new forest to which the server was attached to. Please note that the Office 365 subscription one has .onmicrosoft.com, a same domain is advisable while creating the new domain on this step.

3> Once the domain is created and the server associated, go ahead and create test users as shown in the screenshot below.
4> Coming to the Office 365, there is a need to install Azure AD Connect Tool on the server (on-premises Domain Controller or AD), which will connect the server to Azure AD. The Azure AD Connect tool can be installed from the link

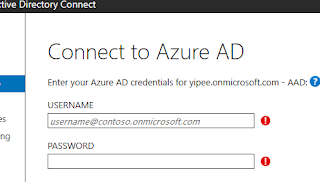
5> For the user synchronization to happen, we can select the express settings but for password synchronization, we need to select the Custom Settings while configuring the Azure AD Connect tool. In the Connect to Azure AD Section, we need to provide the O365 Global admin credentials.
6> Once done, it will ask for to Connect to the Directories. Here, provide the credentials of the server administrator used to access the VM that was created in step 1. Once done, it will connect to the AD.

7> In the next steps, it will ask about the domains. There will be a default domain linked to onmicrosoft.com. The other domain, that needs to be added is the .com domain. Once, added the next steps follow.

8> In the following steps, it will install and automatically take care of the configurations of the Azure AD Connect tool. Once done, it will automatically do the synchronization.    

9> In the Active users in the O365 Admin Center, please refresh and will find the test users that were created in on-premises AD will be reflected there as shown in the screenshot below. The sync type mentions if its synched from on-premises AD or not.

I hope I gave a clear idea on the synchronization aspect and also the steps to be performed for this to work properly.


Saturday, June 14, 2014

ILM SQL Configuration file could not be read: User Profile Synchronization issue in Sharepoint 2010

There was an issue in starting the User Profile Synchronization service from the central administration. Below is the warning and the content of the warning that were shown in the event viewer.

ILM SQL Configuration file could not be read: Error Parcing the SQL File: D:\Microsoft Office Servers\14.0\Sql\SchemaCollections.sql  Exception: Specified collection 'StringSchemaCollection' cannot be dropped because it is used by object '\.GetObjectCurrent'.


Observation and Steps to resolve the issue -

It was observed that the SYNC Database DBO owner was not the farm account but sa account. That was really very odd as I had used powershell to create the service application. For the issue to be fixed, the dbo on the SYNC database needs to be associated to The farm account. Below are the steps that were taken to fix the issue.

1>     Ran the below PowerShell script

Add-PSSnapin Microsoft.Sharepoint.powershell
cls
$syncdb = Get-SPDatabase -Id 97c3f4a3-2df2-47ef-9d36-52438563b0e8   # we need to get the ID from the respective SP farm
$syncdb
$syncdb.Unprovision()
$syncdb.Status='Offline'
$upa = Get-SPServiceApplication -Id cc4ea1bb-a1ee-40eb-8af7-e2bac2359431 # we need to get the ID from the respective SP farm
$upa
$upa.ResetSynchronizationMachine()
$upa.ResetSynchronizationDatabase()
$syncdb.Provision()

2>     Once the above script is run successfully, execute the below SQL script on the SYNC database

Use [Sync_DB]
EXEC sp_changedbowner ‘domain\Farmaccount’

3>     Once that is run, restart the timer service across all the SharePoint servers in the farm. This should fix the issue.

Hope this helps someone....


Sunday, March 10, 2013

Issue in accessing SharePoint Sites from inside the server

This is a very common issue which every sharepoint administrator faces. If the admins are trying to access the SharePoint site from the server itself, they are never able to do so because of the security set up that has been provided by Microsoft. Usually the sharepoint admins use this technique to understand which WFE is causing the issue during routine troubleshooting, if the Host file entry on the servers is made in this format.

127.0.0.1   xxx.sharepoint.com

Once they hit the SharePoint site on that server, it implies that the request is hitting to that server itself. I would suggest the below steps to be followed for the dev, test and staging environment, but wouldn't suggest to do so on production, as this would come under security audit.

Method 1 (recommended): Create the Local Security Authority host names that can be referenced in an NTLM authentication request
To do this, follow these steps for all the nodes on the server: -

1. Click Start, click Run, type regedit, and then click OK.
2. Locate and then click the following registry subkey: HKEY_LOCAL_MACHINE\SYSTEM\CurrentControlSet\Control\Lsa\MSV1_0
3. Right-click MSV1_0, point to New, and then click Multi-String Value.
4. In the Name column, type BackConnectionHostNames, and then press ENTER.
5. Right-click BackConnectionHostNames, and then click Modify.
6. In the Value data box, type the CNAME or the DNS alias or the Host header URL, and then click OK.
Note - Type each host name on a separate line.
Note - If the BackConnectionHostNames registry entry exists as a REG_DWORD type, need to delete the BackConnectionHostNames registry entry.
7. Exit Registry Editor, and then restart the computer.

Method 2: Disable the authentication loopback check
To set the DisableLoopbackCheck registry entry to 1, need to follow the steps on the server: -
1. Click Start, click Run, type regedit, and then click OK.
2. Locate and then click the following registry subkey: HKEY_LOCAL_MACHINE\SYSTEM\CurrentControlSet\Control\Lsa
3. Right-click Lsa, point to New, and then click DWORD Value.
4. Type DisableLoopbackCheck, and then press ENTER.
5. Right-click DisableLoopbackCheck, and then click Modify.
6. In the Value data box, type 1, and then click OK.
7. Exit Registry Editor.
8. Restart the computer.

Wednesday, January 23, 2013

Various Warning Emails in SharePoint 2010

I was working on setting up warning emails on my SharePoint farm, both for Site Quota warnings and warning emails for deleting unused sites. SharePoint provides these two features which can be used, but there has always been confusion about who will be receiving the emails. Before I answer that, lets discuss about the set up for sending out such warning emails.

1> First and foremost is to set up the outbound email settings from SharePoint Central Administration, as shown in the screenshot below. Go to Central Administration >> System Settings >> Configure outgoing e-mail settings


Provide the details of the SMTP as shown in the screenshot below otherwise the other configurations related to Warning emails will be greyed out.

2> Now go to the Central Administration >> Application Management and click on "Confirm Site Use and Deletion" as shown in the screenshot below.

3> On this page one can provide all the details as per the requirement and click on OK. The information would be when would the notifications start going to the site collection administrators and also if auto deletion would be opted for such unused sites as shown in the screenshot below.


 4> The e-mails that are generated because of this setting goes to the Primary Site Collection Administrator only. It doesn't go any other site administrator nor to secondary site collection administrator. You can check the primary site collection administrator by going to Central Administration >> Application Management >> Change Site Collection Administrators . Once can validate the Primary Site collection Administrator there.

5> For the Site Quota Warning, one has to go to Central Administration >> Application Management >> Configure Quotas and Locks . In that option, we need to enable check box inorder to send warning emails when the site collection storage is reaches to a warning limit as shown in the screenshot below.


6> These emails once configured will be sent to the Site Collection Administrators. But these Site Collection Administrators are the ones present in the path
Go to the Site Collection >> Site Actions>> Site Settings >> User and Permissions > Site Collection Administrators.

So, one can add more administrators in that group inorder to get the Site Quota Warnings emails.

Hope this helps and clarifies the doubts about the Warning emails sent by SharePoint 2010.
 

Thursday, January 10, 2013

Not able to delete SharePoint 2010 Web Analytics orphaned databases

I was working on cleaning up the sharepoint farm. I tried to delete the Web Analytics Service Application from the UI but was not able to do so. It was not allowing me to delete the service application from PowerShell either and threw the below error.

Exception calling "Delete" with "0" argument(s): "An object in the SharePoint a
dministrative framework, "WebAnalyticsWarehouseDatabase Name=WebAnalyticsServiceApplication_ReportingDB", could not be deleted because other objects depend on it. Update all of these dependants to point to null or different objects and retry this operation. The dependant objec
ts are as follows: WebAnalyticsServiceApplication Name=Web Analytics Service Application"


 I went to the Central Administration --> Upgrade & Migration --> Review Database Status. I observed that the Web Analytics databases were in "not responding" status.

After some analysis, I found that there were timer jobs that were using the databases which didn't allow to delete the service application. The Timer jobs are as follows -

Health Analysis Job (Daily, Web Analytics Data Processing Service, Any Server)
Health Analysis Job (Daily, Web Analytics Web Service, Any Server)
Microsoft SharePoint Foundation Usage Data Processing
Microsoft SharePoint Foundation Usage Data Import
Microsoft SharePoint Foundation Site Inventory Usage Collection


I went ahead and disabled the jobs. Then I went ahead and deleted the service application from the UI. It got deleted successfully without any issues. I ran the powershell command to clean up any orphaned database present on the sharepoint farm by running the below script

Get-SPDatabase | Where{$_.Exists -eq $false} | ForEach {$_.Delete()}

Thursday, December 27, 2012

Site Directory in SharePoint 2010

By default Site Directory template is not available in SharePoint 2010. Actually this template is in hidden state. In order to make it visible, we need to follow the below steps -

1>  Open  "C:\Program Files\Common Files\Microsoft Shared\Web Server Extensions\14\TEMPLATE\1033\XML\webtempsps.xml" XML file in the mentioned path.
2> Search for Site Directory in the XML.
3> Change the Hidden parameter from TRUE to FALSE.
4> To create it as a sub-site, there is a need to run the following command: stsadm.exe -o activatefeature -id 5F3B0127-2F1D-4cfd-8DD2-85AD1FB00BFC –url http://oursite
5> Once that is done we can see the option of Site Directory template under the Enterprise tab while creating a new Site Collection as shown in the screenshot below
6> Now we can go ahead and create a new site directory using the above template. Once the Site Directory is created, Microsoft provides an option of linking older site collections to the Site Directory. To manually add sites,we need navigate to the Sites list present in the newly created Site Directory i.e. http://sitedirectoryURL/SitesList and add to directory.  We can add any URL to the Site Directory.  We need to approve them as content approval is on by default.
7> For the new sites that would be created, we need to do the below configurations as shown in the screenshot below

In the Central Administration -> General Application Settings -> Configure Site Directory


Once the link is opened, we need to provide the Site Directory URL and enable the Site Creation Metadata.  This is enabled inorder to provide data wrt the site collections either to be mandatory or not. This will be visible when we create new site collections as shown in the screenshot below.

In the above screenshot we have selected only one site category to be mandatory. We get to see the below screenshot when we create the new site collection.
 
When the Site Directory is not implemented, the Site Categories option is not available.

For adding or deleting Site Categories in Site Directory of Sharepoint 2010, steps can be followed as mentioned in the below link, which applies to MOSS 2007, but the same steps can be followed for SP 2010 as well with some self understanding.

http://office.microsoft.com/en-in/sharepoint-server-help/add-or-change-categories-in-the-site-directory-HA010106564.aspx

Now coming to the second link on the Site Directory in General Application Settings in CA i.e. Scan Site Directory Links we can provide links for the lists and libraries looking for any broken or updated link. There is a timer job "Site Directory Broken Links Scan" that runs daily to do a validation and update the Title and Description of any updated link on to the Site Directory.