Thursday, December 27, 2012

Site Directory in SharePoint 2010

By default Site Directory template is not available in SharePoint 2010. Actually this template is in hidden state. In order to make it visible, we need to follow the below steps -

1>  Open  "C:\Program Files\Common Files\Microsoft Shared\Web Server Extensions\14\TEMPLATE\1033\XML\webtempsps.xml" XML file in the mentioned path.
2> Search for Site Directory in the XML.
3> Change the Hidden parameter from TRUE to FALSE.
4> To create it as a sub-site, there is a need to run the following command: stsadm.exe -o activatefeature -id 5F3B0127-2F1D-4cfd-8DD2-85AD1FB00BFC –url http://oursite
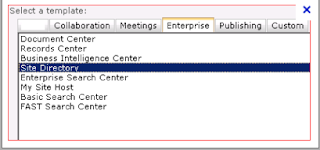
5> Once that is done we can see the option of Site Directory template under the Enterprise tab while creating a new Site Collection as shown in the screenshot below
6> Now we can go ahead and create a new site directory using the above template. Once the Site Directory is created, Microsoft provides an option of linking older site collections to the Site Directory. To manually add sites,we need navigate to the Sites list present in the newly created Site Directory i.e. http://sitedirectoryURL/SitesList and add to directory.  We can add any URL to the Site Directory.  We need to approve them as content approval is on by default.
7> For the new sites that would be created, we need to do the below configurations as shown in the screenshot below

In the Central Administration -> General Application Settings -> Configure Site Directory
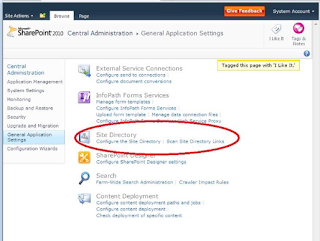

Once the link is opened, we need to provide the Site Directory URL and enable the Site Creation Metadata.  This is enabled inorder to provide data wrt the site collections either to be mandatory or not. This will be visible when we create new site collections as shown in the screenshot below.

In the above screenshot we have selected only one site category to be mandatory. We get to see the below screenshot when we create the new site collection.
 
When the Site Directory is not implemented, the Site Categories option is not available.

For adding or deleting Site Categories in Site Directory of Sharepoint 2010, steps can be followed as mentioned in the below link, which applies to MOSS 2007, but the same steps can be followed for SP 2010 as well with some self understanding.

http://office.microsoft.com/en-in/sharepoint-server-help/add-or-change-categories-in-the-site-directory-HA010106564.aspx

Now coming to the second link on the Site Directory in General Application Settings in CA i.e. Scan Site Directory Links we can provide links for the lists and libraries looking for any broken or updated link. There is a timer job "Site Directory Broken Links Scan" that runs daily to do a validation and update the Title and Description of any updated link on to the Site Directory.


Wednesday, December 26, 2012

SharePoint 2010 search administration reports throwing error


While configuring all the service applications, I came across the Link "View Administrative Reports" under the Monitoring section.  When I went ahead and clicked on the one of the reports "CrawledRatePerContentSource", I got an error  "An unexpected error has occured".

I did an analysis of the ULS logs and found that it could not find the store procedure as highlighted in the screenshot below.

Then after doing some more analysis found that there is a timer job named as "Search Health Monitoring - Trace Events" which was in disabled state. Once this timer job is enabled and executed, the store procedures are created and thus execution of reports happen successfully.


Happy Troubleshooting!!!

Wednesday, November 21, 2012

Issue while deleting web application or service application in SP 2010

I came across an error while deleting a User Profile Service Application and it mentioned "An update conflict has occurred, and you must re-try this action. The object UserProfileApplication Name=User Profile Service Application was updated by [farm admin id], in the OWSTIMER (ID) process, on machine [machine name]. View the tracing log for more information about the conflict."

Below are the steps I followed to remove the User Profile Service Application with out error.
On the server throwing the OWSTIMER (ID) error I cleared the server cache, by following the below steps -
1. Logged into server throwing the OWSTIMER error.
2. Went to Start -> Administrative Tools -> Services
3. Stopped the Timer service by Right click SharePoint 2010 Timer and click Stop

Next I cleared the Server Cache (Win 2008 x64 R2) by following the below steps-

1. Browsed to local drive (c:) on the server
2. Looked for the ProgramData directory.  It is set to be hidden by default. Hit the Alt key -> Tools -> Folder Options -> View and under Hidden Files and folders click the Show Hidden files and folders radio button. Click ok.
3. Next browsed to ProgramData/Microsoft/SharePoint/Config directory
4. Inside this directory there are a couple folders with [GUIDs] as their names. Looked inside each folder until I found the one that has all the .XML documents and the Cache.ini file.
5. Backuped the Cache.ini file and save it in a safe place.
6. Then highlighted all the .XML files and deleted them.
7. Opened up the Cache.ini file and deleted the value inside and replaced it with 1. Saved a close the file.
8.  Went back to Administrative Tools -> Services, right clicked SharePoint 2010 Timer services and clicked Start to restart the services.

Inside the ProgramData/Microsoft/SharePoint/Config directory inside the [GUID] folder that had all the .XML documents and Cache.ini files all the .XML documents that were deleted were starting to repopulate.

Retrying the deletion went through with no error.
 

Tuesday, November 6, 2012

List of Active Sharepoint databases in SharePoint 2010

There was a need when I had to get the list of sharepoint databases present on a shared SQL server instance.

Below PowerShell Command helps to reduce the work in searching the databases individually. We need to go to the Sharepoint Management Shell and run the below powershell command -

Get-SPDatabase | Select Name | Out-File c:\AllActiveSPDBs.txt

The text file will be created automatically if it doesn't exist.

Also you can go and validate the same from Central Administration as well by following the path
Central Administration --> Upgrade and Migration --> Review Database Status


Tuesday, November 30, 2010

How to repair and re-install WMI on a Windows 2003 server

We need to restart the server if we do a repair or reinstall of the WMI. We repair WMI components on the server and if it does not work, then reinstall and restart the server.

We need to follow the below steps in order to Repair WMI :-

1> Open a command prompt window (Run as Administrator) and change directory (cd) to %windir%\System32\wbem on 32bit Windows or %windir%\SysWOW64\wbem on 64bit Windows

2> Run both these commands one at a time-

a> FOR %i in (*.dll) do RegSvr32 -s %i
b> FOR %i in (*.exe) do %i /RegServer
c> FOR /f %s in ('dir /b /s *.dll') do regsvr32 /s %s

3> Net stop /y winmgmt

4> FOR /f %s in ('dir /b *.mof *.mfl') do mofcomp %s

5> Net start winmgmt

We need to verify by running any WMI query to check if the WMI is working on the server or not. If the issue is still not resolved, then we need to use the following command to detect and repair a corrupted WMI Repository:

a> rundll32 wbemupgd, RepairWMISetup
b> we need restart the server.


We need to verify by running any WMI query to check if the WMI is working on the server or not. If the issue is still not resolved, then we need to perform the Comprehensive Rebuild Method.

Important note: If you've installed a Service Pack, you need to insert your Windows XP CD with Service Pack integration (called as the Slipstreamed Windows XP CD). If you don't have one, you may point to the %Windir%\ServicePackFiles\i386 folder for a recent version of the system files required during WMI repair. Or you may create a slipstreamed Windows XP CD and insert it when prompted.

Click Start, Run and type the following command, and press ENTER:

1> rundll32.exe setupapi,InstallHinfSection WBEM 132 %windir%\inf\wbemoc.inf

Insert your Windows XP CD into the drive when prompted. Repair process should take few minutes to complete. Then restart Windows for the changes to take effect.
 
 
Hope this helps someone.

Thursday, September 2, 2010

How to enable the Three State Workflow in a Document Library in Sharepoint

The Three State Workflow, is by default disabled in Document Library but is enabled in Tasks in the Sharepoint Site.

Here we will see how do we enable the Workflow States which are greyed out by default.

Problem-

When we open the Document Library and then go to the "Document Library Settings". Then we click on the link "Workflow Settings". We go to a page where we provide the Workflow name and then click on next button. In the other page, we get the section Workflow States and that section is greyed out. So we are stuck here when we try to create the workflow for the document library.

Resolution-

Here we have to create a column with the type of information in that column should be "Choice". And then add three options like, open, resolved and closed. Thats the reason why we call the workflow as 3 state workflow.
Once that column is specified, Now go ahead and create the workflow. Here in the "Workflow States" section you can see the options and the column name coming up without any issues.

If you try the same on the Tasks, you wont be facing such issue,as already that kind of choice column would be already present.

Hope this helps some onw.

How to disable the "New Folder" option in a document library in Sharepoint

When we go to a document library in a Sharepoint Site, we often see an option on the top as "New" which provides us an option to create a new document or new folder.

There may be a requirement which may come up that folder creation should be restricted for a particular document library.

We can follow the below steps to implement the same -

1> Open the Document library and click on "Settings" tab which comes besides the "Actions" tab.
2> Then select the "Document Library Settings"
3> Now go to "Advanced Settings" link and click on it.
4> There you will find out there is a "Folder" section, where it asks "Display "New Folder" command on the New menu?". Select the option as "No".

Then we are done. Go back to the Document library and click "New". you will get only the "New Document" option.

I would this implementation to be done for small Document Libraries. But for large Document Libraries, it is advisable to split the documents into various folders which inturn would improve the performance.

Hope this helps someone.